Table of Contents:
Section 1 – Preservation
Section 2 – Formats
Section 3 – Damage and Decay
Section 4 – Storage
Section 5 – How to clean a deck
Section 6 – File Formats
Section 7 – Resources and links to various articles and sites
Section 1 – Preservation
Over the course of the next several years, every videotape in existence will become unplayable, including yours. Whereas a reel of motion picture film will, if looked after properly, still be able to be projected many centuries into the future, videotape will probably not make it into the next decade.
The problem is twofold. First, the tape itself is not a durable format, and was never meant to be. This is particularly true for consumer-grade tape, but even the material sold to broadcast professionals will eventually decay to the point of unplayability. Secondly, the machines used to play tapes are no longer being manufactured, and neither are their spare parts. Furthermore, only a very few people have the knowledge required to fix a broken machine, and, before long, no working tape decks will be left to play even those tapes which might in principle still be playable. Whichever one of these catastrophes plays out first, it is certain that video tape will become functionally extinct in our lifetimes.
If you have any videotape in your possession – whether its a box full of home movies, or a more substantial institutional collection – it is imperative that you take steps to preserve it now, if you wish to have access to the material. The professional audio-visual preservation community has been warning for years that the time when videotape will be beyond saving – when videotape of any kind will no longer be able to be played – is approaching quickly.
We recommend that you have your tapes converted to digital files as soon as you can. Of course, we suggest contacting the archivist at Media Burn, who would be happy to transfer your tapes for a modest fee. However, even if you’re not prepared to do that, there are some steps you can take which will better prepare you to preserve your tapes.
The most important first step you can take is to simply go through your items and set priorities among your tapes. It is possible that you don’t have any interest in saving every single tape in your collection. Or, even if you do, the cost of having every one of them digitized may be more than you’re willing to bear, and you might wish to transfer the most important ones now, and save the rest for later. In order to help make decisions about what to do with your tapes, there are some things you can do to help prioritise.
It is obvious that you will want to save the tapes that mean the most to you, and which have content that you won’t see anywhere else. Thus, material under copyright, such as pre recorded videos or broadcast material taped off the air, would not be a priority for preservation (most places that perform video transfers, Media Burn included, won’t handle this kind of material anyway).
Ideally your tapes will all have some kind of writing, indicating what kind of material is on them. Of course, you want to prioritise material that you or someone else you know has shot. Once you’ve made the decisions about which of these are most important to you, you can look at the tapes themselves.
Section 2 – Formats
There have been many different types of video formats created over the years, many of them for professional producers – documentarians, TV journalists, and television technicians. Only a few formats have been developed and sold for consumer use, however, and the kinds of videotape that the general public would have in their collections should be easy to identify for that reason.
If you have videotape at home, it is probably one of the following formats.
VHS – This was the dominant tape format from the early 1980s to the early 2000s. Mainly used for pre recorded programs or for use in home taping off of television, VHS was also used to shoot home videos in early camcorders.
Beta – A rival format to VHS, Beta was only available for a relatively brief period. It was typically only used for prerecorded programs and other home viewing, and was only rarely used for home movies.
Hi8 / Video8 – This was a popular small format, used mostly for shooting. As per the name, the tape itself was only 8mm wide, and was widely adopted for both domestic and professional use (Hoop Dreams, to name only one example, was shot largely on this format). This format, unfortunately, is especially prone to degradation and decay, especially relative to the somewhat more robust VHS. For this reason, these tapes should be prioritised for digitisation.
MiniDV – Though most tape-based formats carried analog signals, some later formats carried digital signals. Just as the plastic 5” compact disc held a digital audio signal, so too could the MiniDV record and play video and audio using digital bits, rather than an analog wave. This is among the physically smallest cassette formats to be manufactured, but is also, unfortunately, among the flimsiest.
Surprisingly enough, it is the most recent vintages of tape formats that are at the greatest risk. MiniDVs, due to the thinness of their material, are actually more likely to suffer from damage or decay than a VHS tape that is decades older. Likewise Hi8 / Video8 tapes, which are notorious for their susceptibility to the ravages of age. Obviously any kind of tape format may fall victim to obsolescence in this way, but if you have any MiniDV or Hi8 / Video8 tapes, we suggest making their preservation a priority.
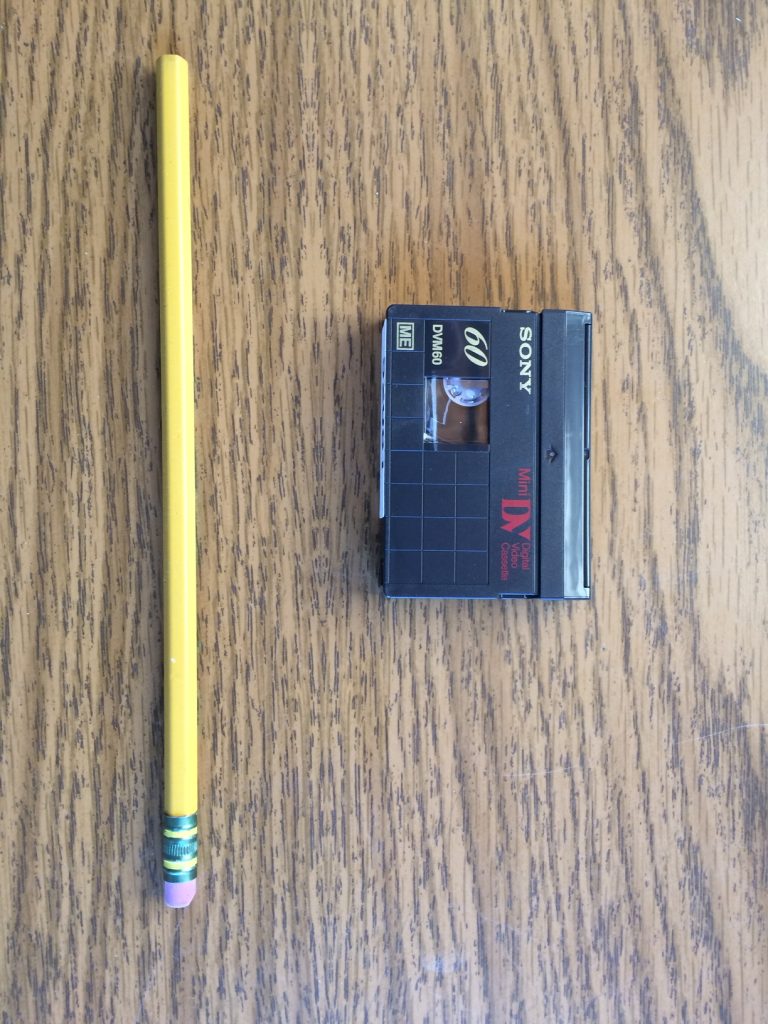
MiniDV – Front 
MiniDV – Back 
MiniDV 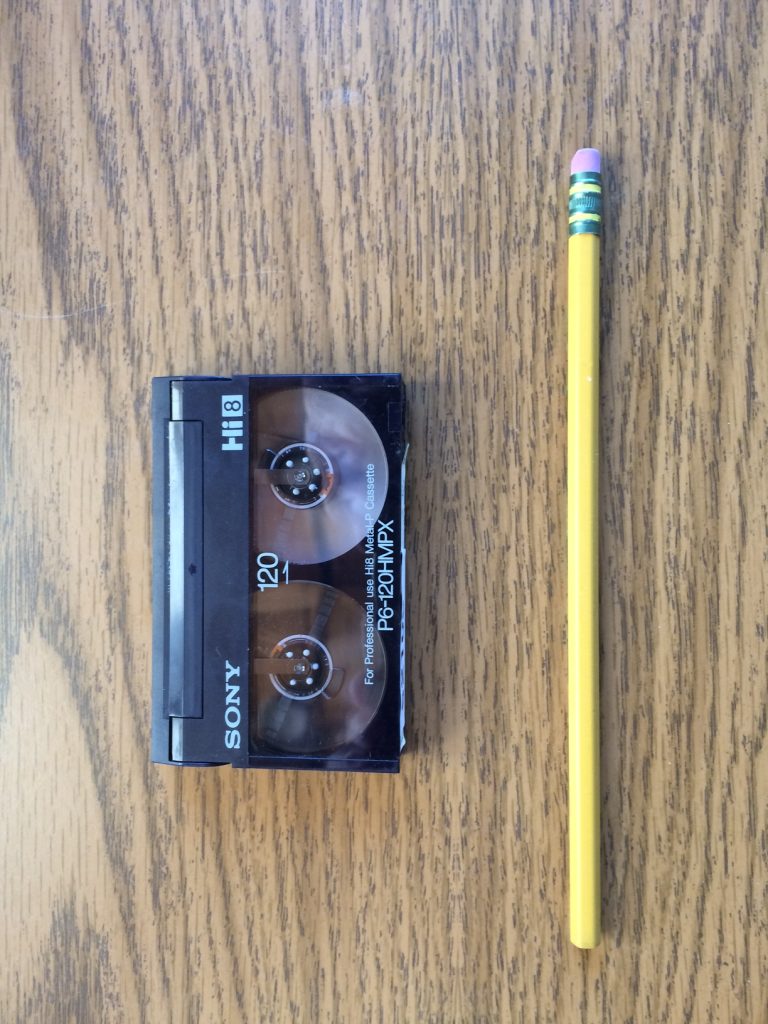
Hi8/Video 8 – Front 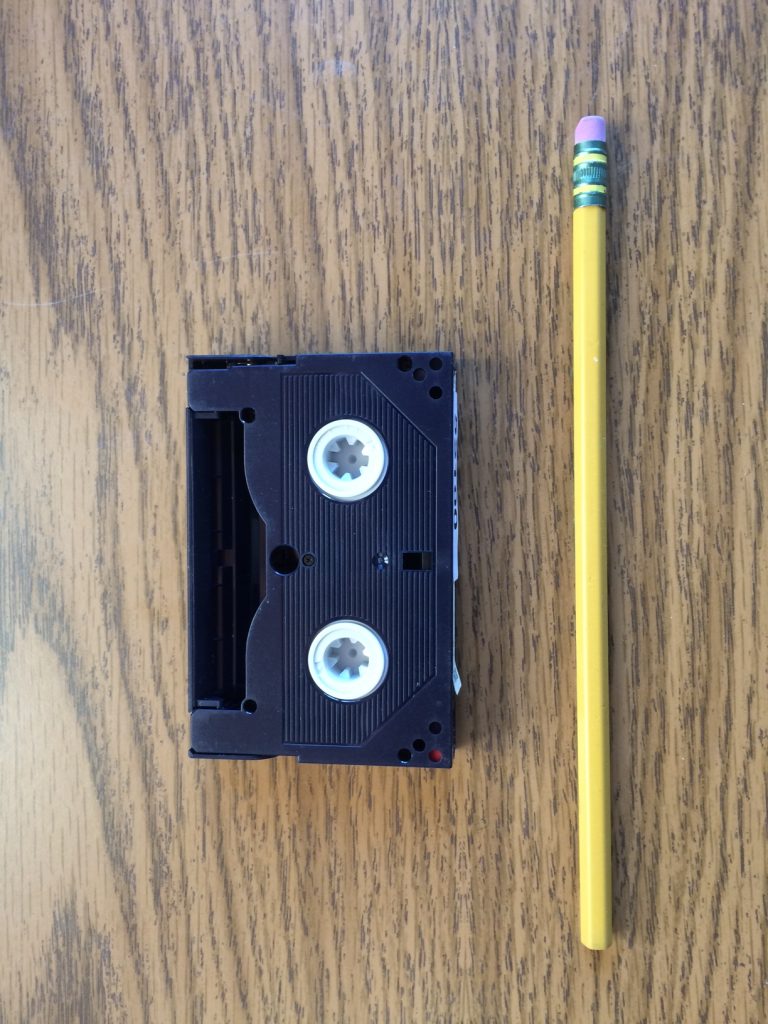
Hi8/Video 8 – Back 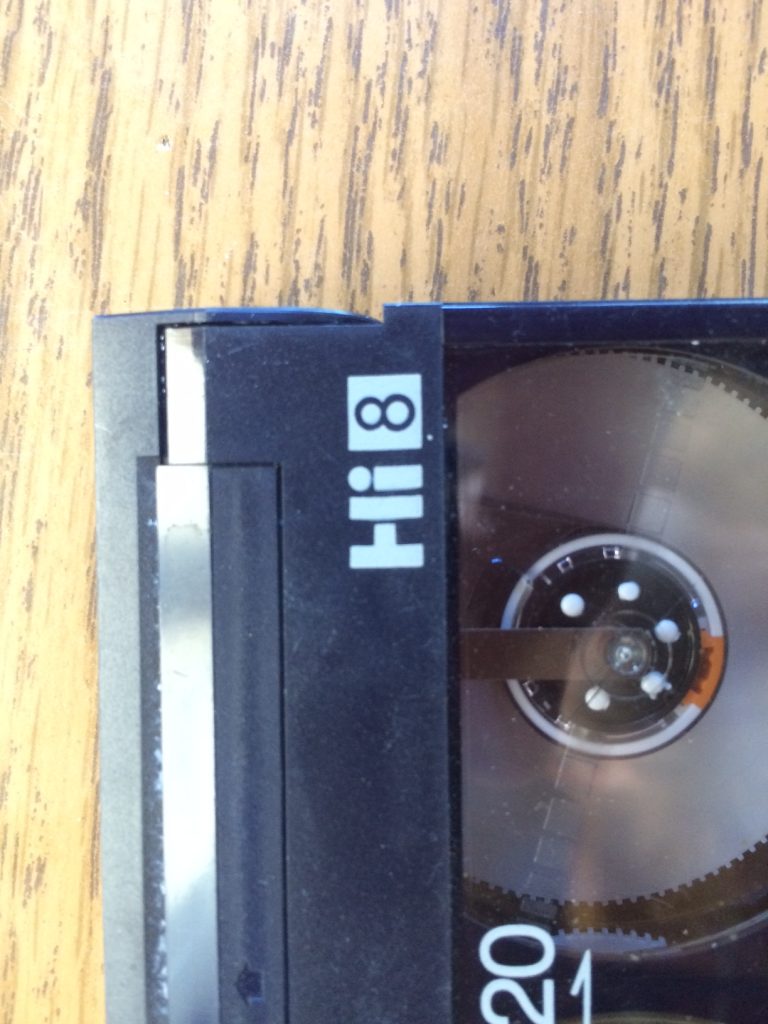
Hi8/Video 8 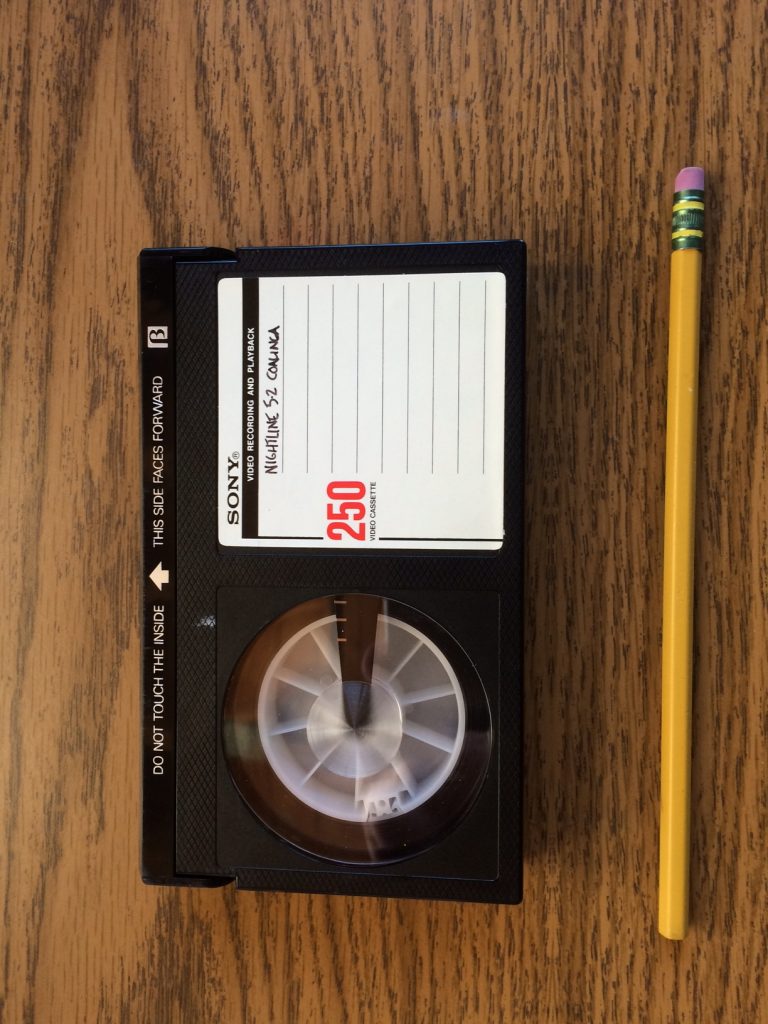
Beta – Front 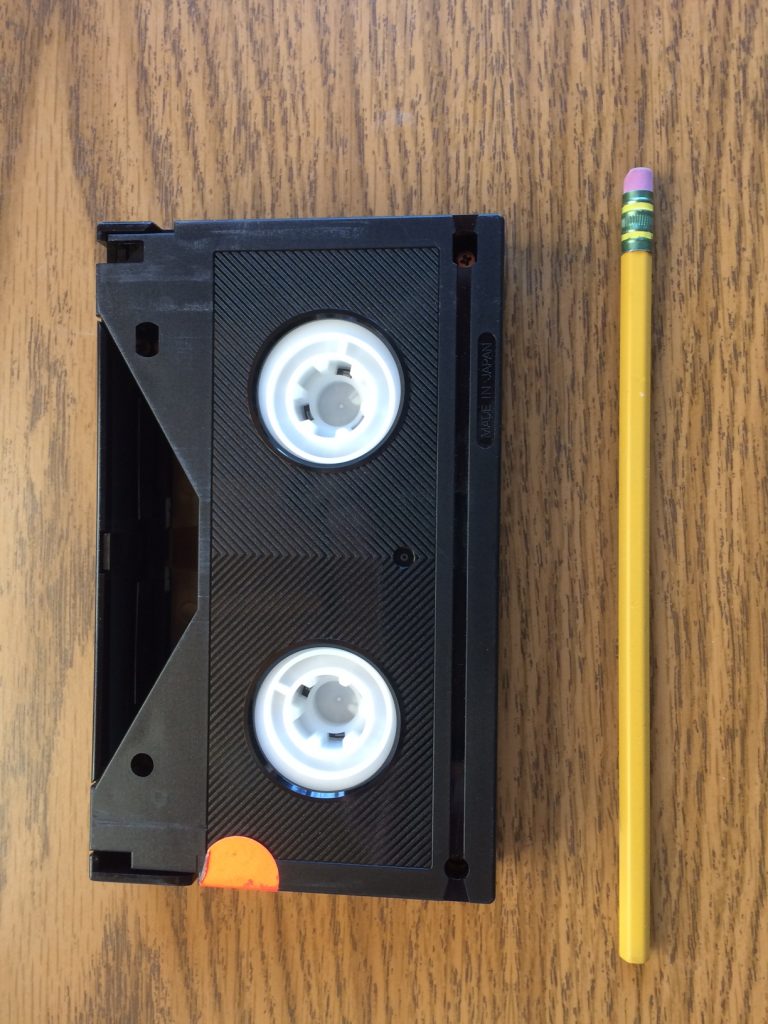
Beta – Back 
Beta 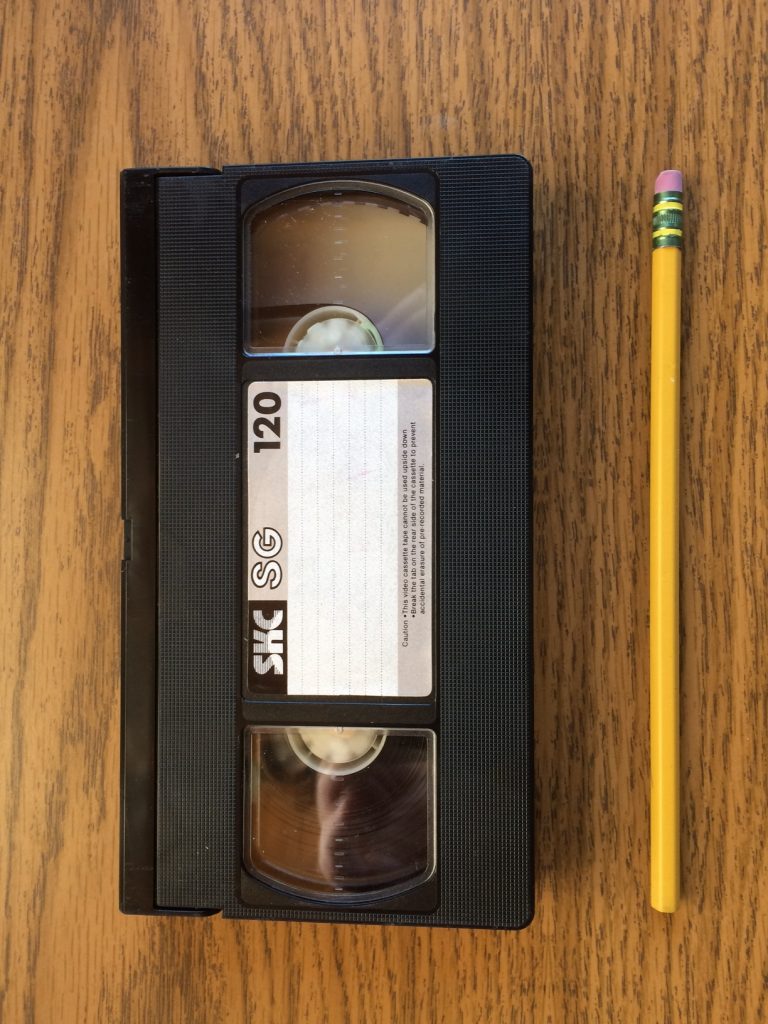
VHS – Front 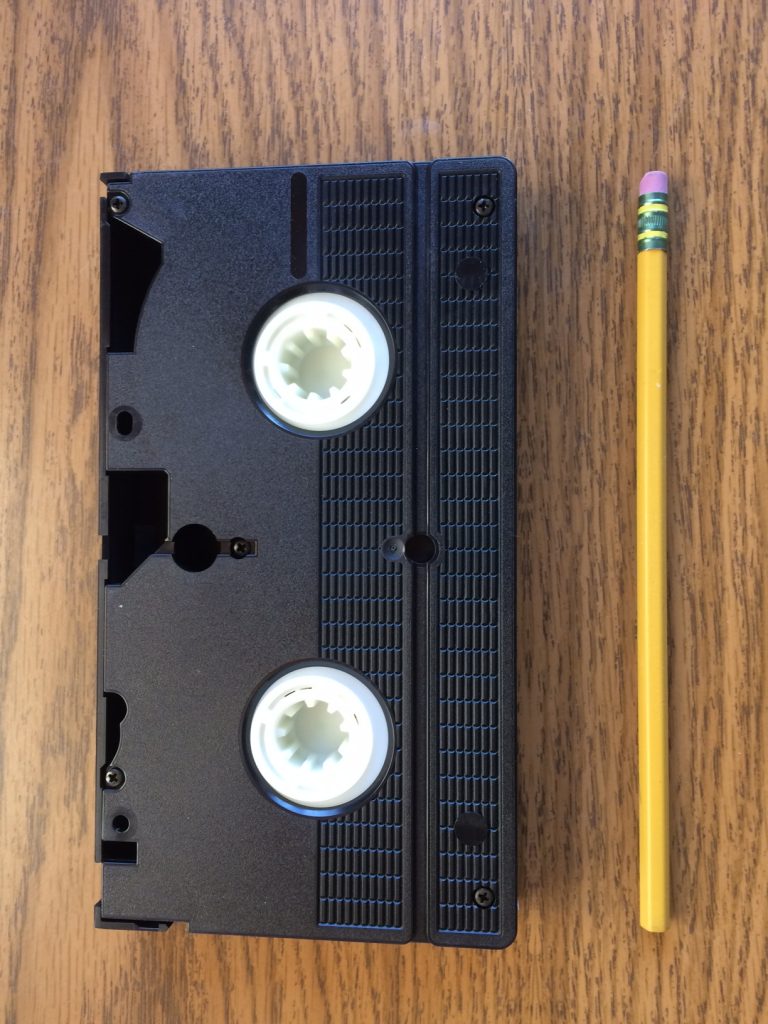
VHS – Back
Tapes suffer physical damage in fairly predictable ways. These are some of the major problems that will probably plague your tapes, with some advice on how to deal with them.The most important first step you can take is to inspect your tapes for damage. This may be done even if you don’t have access to a video player right now; all that is needed is your tapes.
Remove the cassettes from the case. Does the cassette seem to be damaged in any obvious way? Most cassettes have only two sets of moving parts that need immediately concern you, the wheels that turn the tape, and the hatch which opens so the playback machine can access the actual tape. Do these seem to be functioning properly? Will the hatch open?
Due to improper handling, accidents, or other misadventures, the plastic cassette housing may become damaged in such a way as to hinder the tape’s ability to move through the machine. In most cases, this can be solved by removing the screws on the bottom half of the cassette, opening it up and manually repairing the damage. This is not a recommended course of action for those who don’t work with video regularly, as the cassettes have a fair number of moving parts that can make re-assembly difficult. Seek the aid of a professional rather than opening up the cassette on your own.
The tape itself could become damaged; mishaps in the machine could result in tape becoming crumpled, bent, or even torn. Once this occurs, loss of image in that spot of the tape is all but certain. In the event of a tear, the tape may be mended by means of a small piece of scotch tape applied to the outer edge of the tape (ie, the side of the tape that faces away from the cassette; under no circumstances should you put anything on the inner edge of the tape, as this will likely damage the head during playback). This is not a long-term solution, and is only to be used to play back a tape once or twice.
Look as the spool of tape through the small window of the cassette. Look closely for signs of mold. These will most often appear to be white gunk, often but not always fuzzy, littering the tape pack. Refer to the following pictures.
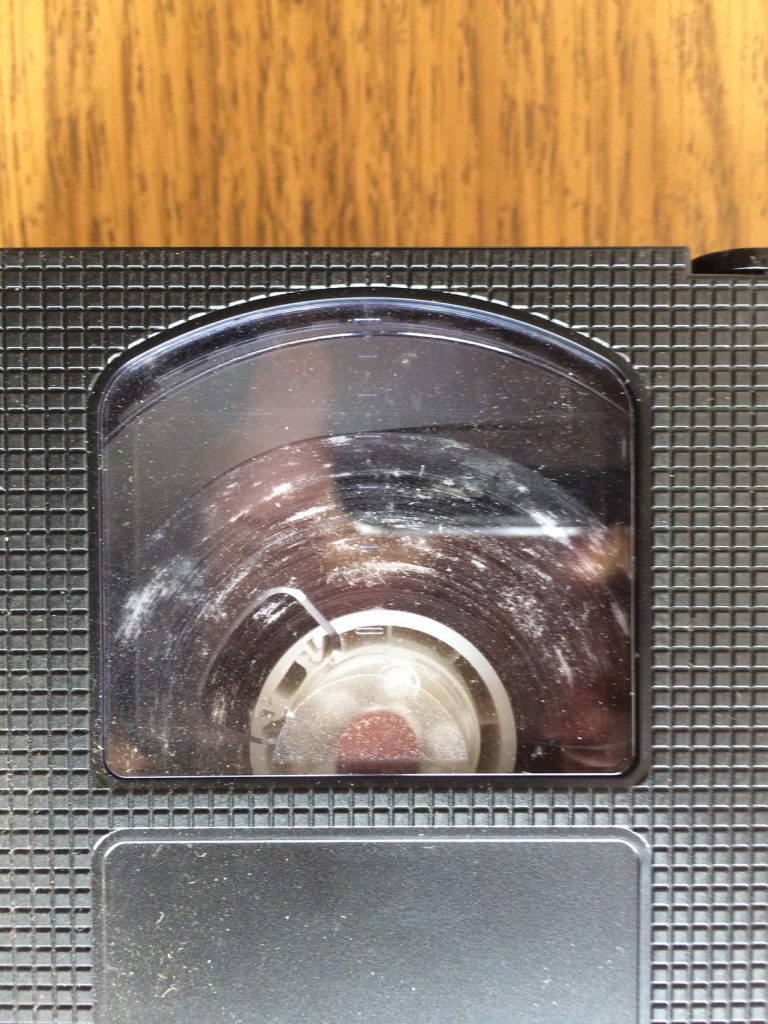

Any tape you encounter that looks like this must be separated from the rest of your collection – as mold is contagious, and may spread to the other tapes – and put in a plastic bag tied shut with a knot. If you have moldy tapes, do not play them under any circumstances, as they may contaminate the playback machine.
If your cassette isn’t moldy, open the hatch, and smell the tape – don’t inhale deeply, but take a short whiff. Under normal circumstances, it will smell vaguely of plastic; if it is experiencing decay, it may smell like wax crayons.
A waxy smell may be a sign of sticky shed syndrome. This occurs when the tape has been exposed to too much ambient humidity for too long of a time. Tape consists of a plastic ribbon covered on one side with thousands of tiny metallic particles. It is these particles that carry the image and sound signal, and they are bound to the ribbon with a kind of glue. If that glue absorbs too much moisture, it ceases to act as a binding agent, and the metallic particles begin to shed from the tape during playback. These will often become lodged in the magnetic heads, resulting in an illegible image.
However, this can be treated by a professional. In some cases, baking the tape at an elevated temperature for several hours can dry it out enough to make it playable again, at least for a brief period. This should only be done by a professional, and should not be attempted in your own kitchen.
If any of your tapes are damaged or beginning to decay, you may want to make those a priority. It’s possible that they may not be able to be played for very much longer, and you will want to transfer them while you still can. Media Burn can handle tapes with these kinds of conditions, and have had great success in getting sound and image off of problematic tapes.
Section 4 – Storage
As a general rule, media items of any type should be stored in the coolest (but not freezing) and driest space you can find. The ideal temperature for videotape storage has been estimated between 40-70 degrees Fahrenheit, and the humidity should be kept as low as possible (50% relative humidity is the recommended metric). If these conditions can’t be easily met, try to get as close as you can.
Other recommendations for storage follow common-sense rules that you would apply to any items that you wanted to keep in good condition. Don’t store them in a box on the floor, since they may be in danger of water from a flood. Don’t keep them under any kind of water pipe, as they may burst or leak, causing water damage to your collection.
In the end, however, long-term storage is not a serious concern, as, even if optimal storage practices could prolong the physical life of the tape for years or even decades, the obsolescence of playback equipment will still continue apace, and the tapes will be just as unplayable as they would be had they decayed on their own. For that reason, you shouldn’t spend too much time on trying to approximate the perfect environment for storing your tapes.
If you try to play a tape in a machine, it is possible that the resulting image will suffer from obvious interference – static, muffled sound, etc. There could be a number of reasons for this, including tape decay, a serious mechanical or electrical failure in the playback machine. However, a common cause of poor image is simply a buildup of dirt inside the machine itself. Fortunately, this can be easily remedied with the aid of some common household tools. This is not guaranteed to fix the problem – the ultimate issue may be more complicated than what one untrained person at home can address – but it’s certainly worth a try.
First, unplug your playback deck, You’re going to be rooting around inside, and you always want to disconnect any machine from its power supply when you do this, so as to minimize the danger of electric shock.
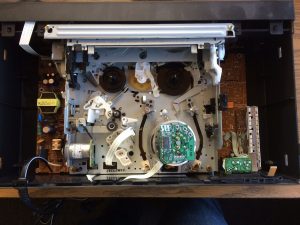
Next, loosen the screws that hold the upper lid of the machine in place. The specifics of this will be different for different types of machines, but generally there will be a large fitted piece of metal which covers the deck’s innards, and which screws into the body of the deck around its perimeter. Loosen these screws and gently coax the lid off of the machine. This should reveal the various mechanical parts which make up the guts of the deck.
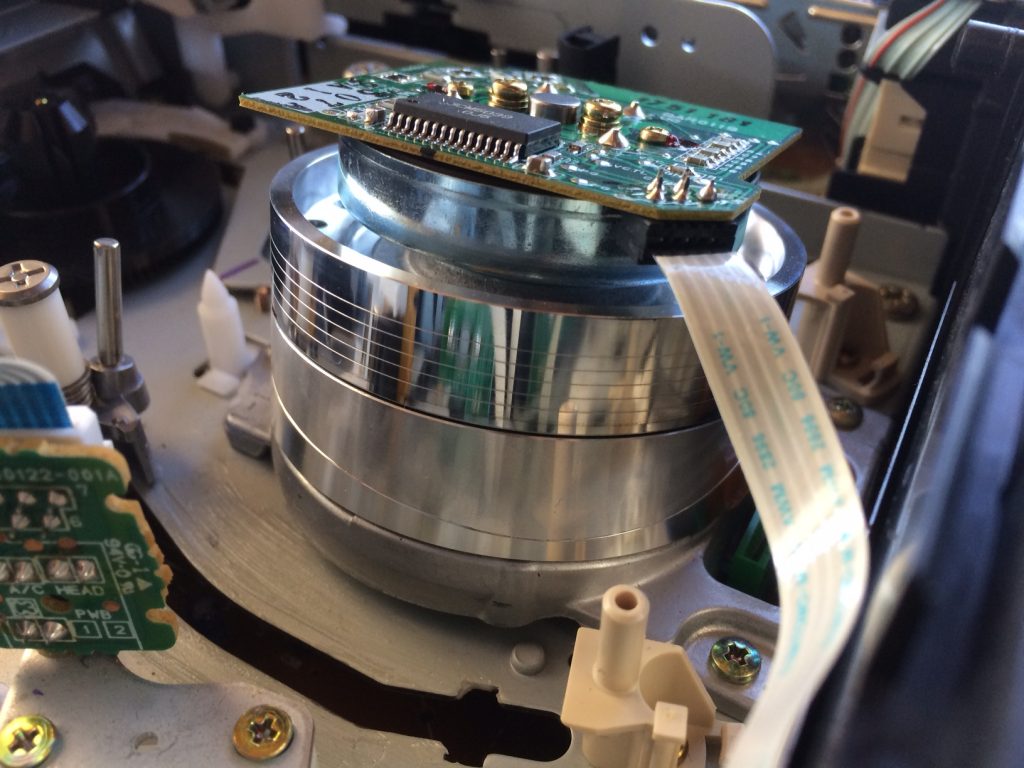
Roughly in the center of the deck, you will see a small, silver drum-like apparatus. This is known as the head. Within this silver cylinder are a set of small magnets; when the machine is engaged the tape is wrapped around the head, which spins very quickly. In this manner, the signal on the tape is read by the magnets, and then these electrical impulses are turned into images and sounds by your television.
With the head being in constant contact with the tape, over the years, dirt and fragments of the metallic particles from the tape can build up, sometimes blocking the magnets from reading the signal. This can appear as video errors on your television. Much of this can be solved by cleaning the head.

Find either a lint-free cloth or a piece of smooth notebook paper. Wet the cloth or paper with 99% isopropyl rubbing alcohol and press it, gently but firmly, to the side of the drum. Touching only the top edge of the drum with your fingers, turn the head slowly underneath the cloth/paper. Note when you can feel the small holes containing the magnets passing under your hand. Give the drum several good turns, and then stop and check the cloth / paper. It should look like this.
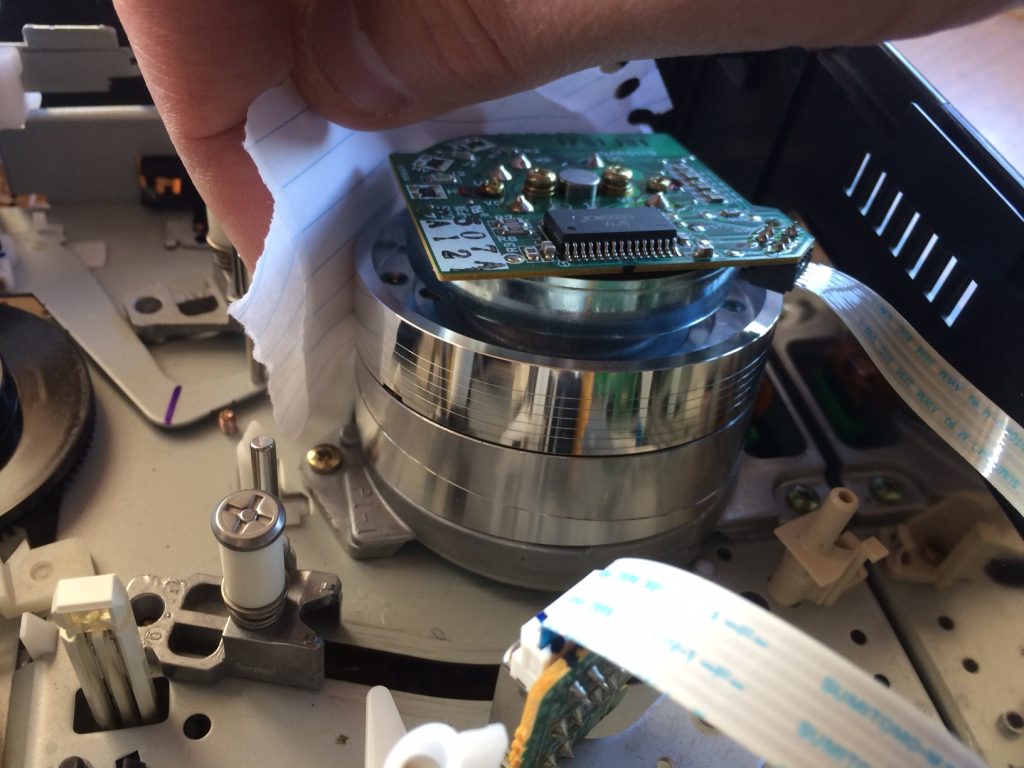
Press paper to the side of the drum 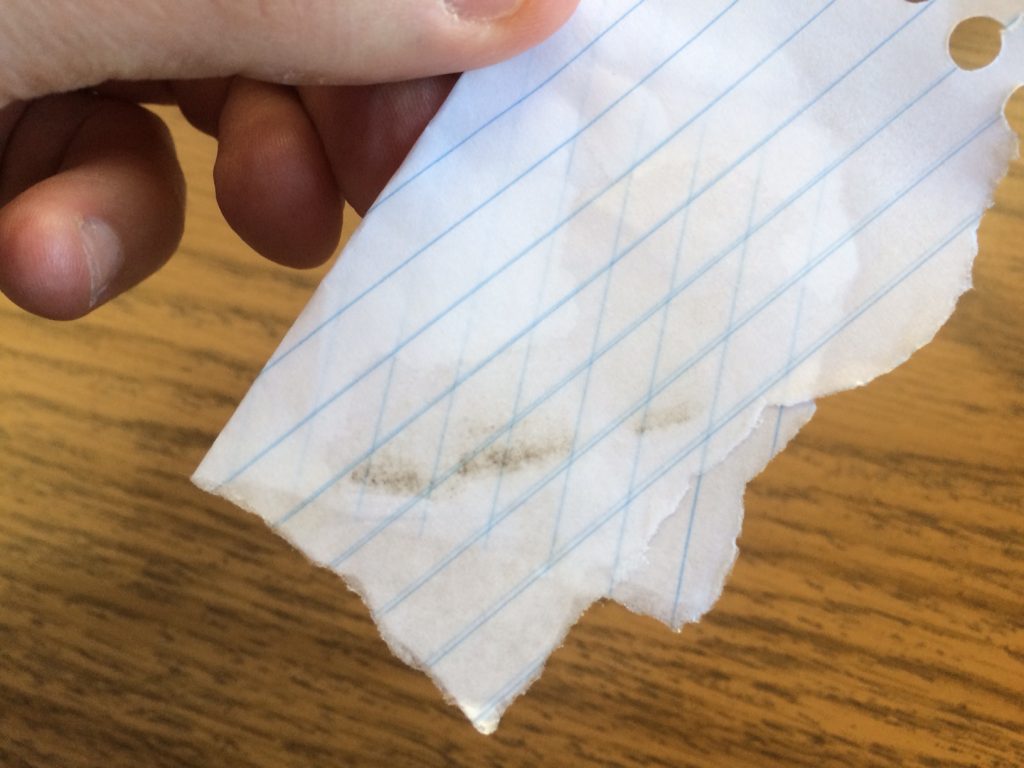
Check the cloth.
Do this until the cloth or paper no longer picks up dirt or streaks.
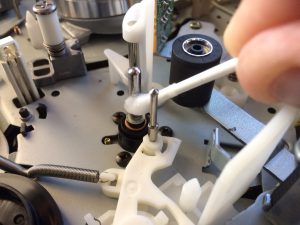
In addition to the head, you should also clean the tape path. While a tape is playing, the machine pulls the actual tape along various points inside the deck, usually pulled by a system of metal or plastic pegs. This is the tape path. At every point at which your tape touches the inside of the deck, various dirt and magnetic tape residue may build up; this may find its way to the head, causing clogs and giving you a bad image.
To see where exactly your tape goes inside the deck, you can plug your deck in and put a tape in the through the front hatch, and hit play. You should see the machine’s automatic processes pull the tape out of the cassette and through the deck. Note the points where the tape touches a peg; these are the surfaces to be cleaned. Eject the tape, and unplug the machine.
To clean these parts of the deck, take some q-tips, and dip one end in some rubbing alcohol. Firmly swab the surface of each peg that has touched the tape, taking care to notice if any dirt builds up on the end of the q-tip. Once one has become coated with dirt, switch to the other end of the q-tip. Any metal or plastic part of the deck can be cleaned in this fashion; however, you should never, ever apply rubbing alcohol to any of the rubber parts that may be in the deck, as this will dry them out and render them unable to function.
After you have cleaned the head and the tape path, close the machine back up and wait 15 minutes for the alcohol to dry out. After that, you may try playing a tape again. If you still find poor image and sound, the problem is either with the tape, or is the result of deeper mechanical failures in the deck.
6. File formats
In order to keep the content on your tapes accessible, they will at some point have to be digitised. This should be done by a professional vendor. At the end of the process, you will have a collection of files on a drive. While there is much that can be said on the subject of file formats, a few brief words will suffice here.
For the purposes of long-term archiving, many institutions will create at least two files from one digitised tape. One will be the master copy, likely in an uncompressed file format, often a .mov or .avi. This means that all of the raw image and sound data will present without compression. Generally, this is not good for viewing purposes, as there is often simply too much data for your computer to process into a legible image. It is useful to think of this kind of file as the original negative of a motion picture film, which is not technically projectable, but is kept in the vault, and used to make viewing copies. The uncompressed file likewise will live on a drive and become the basis for access copies. The access copy will usually be a compressed file, such as an .mp4. These will be a relatively small file, but should still faithfully reproduce the image as found on your tape.
When you take your tapes to a vendor, you should ask about what kind of file formats they offer. You may or may not wish to have an uncompressed master depending on how much storage space you have, but you should be certain that the vendor will give you formats that you can play. Make sure, too, that they assign names to the individual files that you will be able to recognise – the exact names of your files isn’t important, but it should be something that links it to a particular tape so that you can easily manage them at home. Otherwise, your file names may consist of a string of random numbers and letters, which will be difficult to identify at a glance.
Section 7 – Resources and links to various articles and sites
https://archive.org/details/At-Home-Digitization_HomeVideoDay2014
https://xfrcollective.wordpress.com/resources/metro-xfr-rack-zine/
https://archiving.witness.org/archive-guide/
http://www.avartifactatlas.com/
https://calpreservation.org/wp-content/uploads/2018/06/2018AudiovisualFormats.pdf
https://amiaopensource.github.io/cable-bible/
https://www.weareavp.com/wp-content/uploads/2010/04/AVPS_Codec_Primer.pdf
https://github.com/XFRCollective/WorkflowDocumentation
https://docs.google.com/document/d/1oJvr8zCMK4A97GF9xYOM0uijDqyNStuwjtZ23yMRkGw/edit?usp=sharing
https://docs.google.com/document/d/12aZv3QDCcQSkVmHjmwAgywOgDeV41bt8kAlBhiQ6XZo/edit
https://web.archive.org/web/20131014071332/http://activist-archivists.org/wp/?page_id=328
https://web.archive.org/web/20160325111123/http://activist-archivists.org/wp/?page_id=356
https://www.arts.texas.gov/wp-content/uploads/2012/04/video.pdf
http://www.specsbros.com/disaster-recovery-magnetic-tapes-can-survive-flood-exposure.html
http://www.specsbros.com/disaster-recovery-images-of-flood-damaged-tapes.html
https://amianet.org/wp-content/uploads/Resource-Disaster-Recover-First-Actions.pdf
http://www.specsbros.com/preservation-tape-endangerment-issues.html
http://www.specsbros.com/preservation-minimum-tape-handling-standards.html
https://www.nfsa.gov.au/preservation/guide/home/caring-video
https://www.weareavp.com/tips-archiving-family-history/
https://bmrc.lib.uchicago.edu/resources/legacy-management-resources-portal/